Wednesday, 22 April 2015

Evaluation


Elliot Gascoigne Evaluation OUAN503

So to start this evaluation off, I would say that I was not prepared or neither did I anticipate what was in store for me. I say this due to the large work load that I undertook in the module, but this doesn't excuse the way I handled this workload. It started off slow and I didn't give it the attention it needed due to prioritising other modules above this one. And continued to do so until the very end where I was struggling to complete the work in time. But this is all down to my time management and workload management.
The briefs themselves were caused a mixture of emotions; there were a couple of strong briefs and a few not so strong. This was down to time management again but it also was down to me selecting the right brief. Even though we went through various exercises to be able to assess these briefs but it’s like the notion: how many times do you have to tell a child not to touch something because it’s hot, until the child touches it. This notion applies here as we learnt the fundamentals of choosing the right brief but in one case I chose the completely wrong brief, this was because the deliverable was nothing that I felt comfortable doing and felt I could put my own skills into it, but this turned out harder than I’d thought. So this has taught me the valuable lesson of choosing the brief that I would be good at! Also to choose the method and medium that I am good at, as there were a couple of cases where I decided to use the process of progressive line animation and as much as I find it easy the result is that of a shoddy, amateur looking animation that I was too ashamed to submit. So the experience of choosing the right brief as well as the right technique shone through towards the end of the module.
But it’s not all doom and gloom as there was a brief that I chose that let me show off the skills that I had learnt with the software Maya, it was the 3D exhibition brief where I had to re-create an exhibition using 3D software to create a virtual exhibition, I enjoyed every aspect of this brief as I think I found where my skills lie, answering the brief was fairly easy due to the strict requirements, so as long as I kept to the right measurement and textures I would produce what they wanted.
The things I have learnt from this module are mainly the way in which to choose and approach the right brief and the right way to approach said brief. This took failing at different approaches, but this failing taught me on how to approach similar briefs in the future. Another question that I raised to myself was that where do you cross the line between doing something because you have to or doing something for personal gain. This notion came to fruition due to myself set brief of creating a range of models as Christmas gifts, having two days to make them I was so determined to complete them because I didn't want to not have a gift for my friends and family. Other briefs will be paid so you want to produce high quality work to get more money. Even though I was losing these models I made it was still for personal gain, whereas the other briefs were mandatory to complete which gave me a false sense of motivation. So after this module I will definitely start assessing what I am doing it for and go in depth as to why so this false sense of motivation will turn into real motivation to achieve a good quality result.
I'm not saying I'm going to miss responsive as the stress was strong, but obviously that was down to various aspects of my own judgement that affected the work flow. But I did learn some valuable skills throughout the module, at first the strenuous tasks of listing assessments of briefs and relaying that assessment to a peer and doing it over again seemed very annoying and tedious, but as I looked back at my notes, now being at the end of the module, I noticed things that would have really improved my outcome for the first brief. The effects started to show through the collaboration brief where me and my partner assessed the brief once more to double check and realised a problem that we had to rectify. This proves that the lessons learnt are valuable, and ones I will remember throughout my creative career.

Project Report


After much tinkering around with stitching my PDF pages together and uploading to issuu and becoming familiar with its workflow I am pleased to say I am thrilled with the result! I will definitely be using issuu in more of my projects!

Collaboration Boards


Collaboration Boards


Individual Boards


Individual Boards


Collaboration Brief


ERROR!!

We stumbled across a slight issue. we read the brief over once more, and it stated that they dont want compositions ... this left us stumped. so we decided that we could go on location and take them there. but we soon created a new idea that would be more appropriate to the brief. we can use our models in thier own natural environment with thier back to the camera, this would keep with the companies ethos of identity and subcultures. there wont be any identities but rather their own stereotypical environment

Computer Wiz
(a somewhat new un established sub culture)

Punk

Artist

Here are the images that we created


This piece links better to the brief and its guidelines, but also with the company, various sub cultures might not believe in using technology as a way to increase the sub cultures longevity.

Collaboration Brief


Animation example

I wanted to see how the animation would work and look on our photos, it turned out quite well for an example of where we are heading. obviously it is only a prototype of the quality we are going for but it gives us a good visual guide.


Collaboration Brief


Mock Ups

Here are a selection of some of the mock up images used to create the animations, shot with a green screen and studio lighting in my own room

Green screen set-up


Photos


Here is the key


And here is one of the edits that we created as a mock up


As you can see the key didnt work very well due to the green screen quality, so we will keep going to decide wether we can carry on with the quality.

Collaboration Brief


Pitch Boards

Here are the initial boards that we produced in preparation for a peer review session:


Here was the feedback that we recieved from some of our peers after leaving some questions for them to freely answer:

This probably doesn't stand out enough to judges

Without a storyboard I'm not sure how the animation will play out

The QR code will catch the judges eye

Bright coloured images are too jarring, they dont fit with the colour schemes

Background is too dark

Needs more writing

So we will re assess our approach 


Collaboration Brief


Initial Ideas

The process was hard due to the lack of experience in the photography world, but we eventually came to an agreement through Kane's blog, he had some images that struck a brain wave and helped us create the idea of some simply clothes models in front of an abandoned warehouse style backdrop, and possibly do some animations over the top of them using simple line drawn animation. to add our own flare. here are the examples of inspiration Kane showed me


here are some sketches provided by Kane to include in the animations


the premise of our idea would be something that is printed as a poster that contains a qr code that links to an appropriate animation

Collaboration Brief


Brief

The brief we have chosen, after much deliberation, was the i-D brief. it was quite a controversial choice due to the nature of the brief, I will explain shortly. but here are the main bullet points that sum up the brief and how we plan to aim whilst we approach the brief:


Capture the essence and energy of subculture in a series of 3 images

They should work as a group and stand alone images

Have a real point of view for your images

Avoid cliches

Consider reflect subject style

Unique twist

Literal of abstract

Originate don't imitate

3 Strong photographs that will work in print, cannot be collages or composites

Being as though neither of us have a photography background, we thought it was an ample opportunity to produce something different to all the other briefs that are going to be submitted to i-D and hopefully put our own creative twist into the creation!


Collaborative Brief


Collaborative

My collaborative was my friend and house mate,, despite being told that it was a bad idea to work with a friend, we looked past the doubts and advice due to our solid understanding of our individual artistic direction and was fond of the premise of combining our work efforts together. to further solidify the trust in each other that we wont take artistic dominance, we signed an agreement that outlined what we plan to do and what we were bringing to the table:


Collaborative Brief


Choosing to collaborate

The main focus of this brief was to get familiar with working as a team and coming to a combined response to the brief. as we haven't been tasked to do so before this will test the limits of everyone involved in the module due to the unknown principle of creative teamwork. not just feedback but a working partner who has their own artistic direction. here is the assessment of certain things I had to offer to approach my potential collaborate with


Puzzle Range Brief


Final renders

Here are the range of puzzle arrangements representing 3 different types of puzzle that Piri produce, I did this so they could see the arrangement being used by not just one of the puzzles and the colour scheme but three of them. after getting feedback from my peer, I did later agree that I could have used more than one colour in the stacks as the buyer wouldn't buy three of the same puzzles. this was something I should have considered whilst approaching the brief. it comes down to brief assessment and assessing the demographic.


A few background considerations would be that the lighting could be greatly improved, this could be accomplished by researching into object photography. and also just to note the eyelets were added for authenticity.

Puzzle Range Brief


Labels

I wanted to include some more detail in these puzzles to get a good representation of them to better respond to the brief, so I emailed for the labels so I could use them as texture maps in Maya. here is one set of the labels that I was given (out of 3)


These labels proved quite tricky to get placed correctly due to the scaling of them, In the end I had to select the faces I wanted the label to fill and then slowly adjust the coordinates of them to achieve the best fit. for example the coordinates for the rectangular label are as follows

Coverage - 0.1    0.216
Translate-  0.38    0.365

This meant I could just change the file that's responsible for the uv and the coordinates would stay the same. this wasn't the case for the round labels however, these I had to adjust individually. If I were to approach a similar brief I would definitely try and get the same sized labels for each element that are the same!

Puzzle Range Brief


Arrangements

Here is the handkerchief plan of how I was going to arrange the puzzles to show them off in the most effective way


As you can see I'm still keeping the tower but also using a pyramid to break the pattern down in to a more aesthetically pleasing one. using the same technique of representation of course, having the puzzles on plinths in front of a sloped backdrop.

Puzzle Range Brief


Decision

After getting feedback on the initial first designs using Maya, it was decided that the designs I submitted might not be very appropriate to the brief, as they wanted uniformed ideas where there wasn't too much differentiation from the original puzzle. here was my idea


And on further analysis of the feedback I must agree with the advice given to me. they do all look out of place, so it was agreed that I would now just use the original puzzle and stick to the fundamentals of the brief, creating a virtual representation of the puzzles in an innovative way. so now I will be focusing on the arrangement, as the tower is still one of my favourite representations.

Monday, 20 April 2015

Puzzle Range Brief


My Ideas

Here is the design sheet I quickly put together to get some ideas on paper, there are different experiments with the shape of the puzzle boxes to explore innovation, and try to create a completely different style of box using the original design


Its quite different to my usual style, I normally build my ideas up from a handkerchief sketch, which is my most prefered method, but this one felt a bit too fast! a bit of peer feedback made me agree that the two ideas at the bottom need re-thinking, the bottom left one looks a bit too much like a spaceship and the one to the left resembles something not fit to write on my blog ... I will be re-thinking these designs in Maya where I can sculpt them freely and see how the objects react.


Puzzle Range Brief


Colour Scheme

Here is the colour scheme that I was given, Its not very detailed but they will be the main colours of the puzzle boxes that I should use:


 I quite like the colour scheme due to the simplicity of the colours due to the way its going to be quite simple to replicate in Maya.


Puzzle Range Brief


Piri Puzzle Virtual range

As a follow up from the virtual gallery, Piri art who were featured in Datomec's exhibition recognized the potential of virtual models and representations. here is the email I received from the managing director of Datomec:


I am sure there will be a big demand for what we are doing.
Am going to look for the domain 'Vworld'
Or something similar.
VW for short.
There will be a new page on Datomec to showcase VWorld and a new web site (eventually)
Virtual sets, galleries, high streets, products, shops ........ anything.
We can create anything.
The feedback I am getting from the artists is unbelievable. They LOVE IT. (Your work that is)
And they LOVE the concept.
Just imagine creating a high street. Both old and new.
A video combined with an interactive brochure directing people to other shop websites etc etc.
For PiRi ART + Design.
No more real exhibitions.
No more expensive renting of space.
No more costly framing and printing for show specific material.
No more limited footfall.
No start dates, no end dates.
We can create anything, anywhere and make it available to millions…….. instantly.

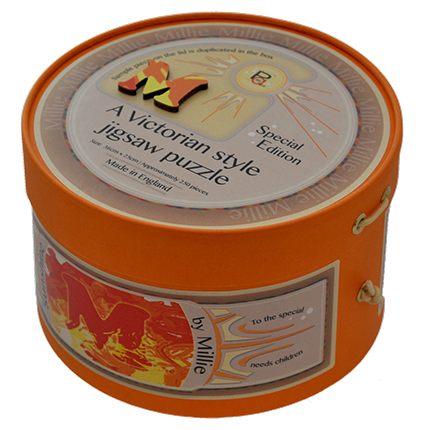
So there is definitely potential in what Datomec wants to do! but the work Piri wants me to do is to create virtual models of the puzzles that boasts the innovative design and to add any other designs for consideration, all staged like a real photo shoot. here are a photo of one of the puzzles:


Christmas Brief


Final Models

Here are the final models that I created, all ready and waiting to be given to the recipients. It took two days of waking up early to work through the day until late at night, I went through about 8 tubes of super glue, 10 films (I like to have films on in the background, it helps me concentrate and it is the way I work) a couple of rolls of mod-rock. but I achieved the goal of 4 houses on islands as Christmas gifts. I benefited from this self set brief due to the strict time schedule. this valuable experience has taught me what its like to get up and work straight through until the early hours of the morning to get the brief done.


Here is a shot of the lid being taken off.

Christmas Brief


Day 2

Day 2, the final day ... I had to finish modelling the houses and then undercoat all of the models then paint them with detail, this was a daunting task due to the amount of painting I had to do in one day, and from experience that if you use a hair dryer to dry layers of paint quickly then those layers are prone to chip. but this was something I had to accept might happen due to the time schedule.


after the islands were painted and flocked I was then modelling the rest of the houses, creating the seperate roof segments took about 6 tubes of super glue, I used super glue as opposed to my preferred pva due to the quick drying time, which was crucial in this brief.


Now that the houses were modelled it was on to the painting of them, using the same technique as the islands, undercoating black and then dry brushing custom colours onto different features.


After a long day of modelling and painting they were done!! ready to pack for the recipients.

Christmas Brief


Day 1

Day 1 was for planning (as seen in previous post) and the creation of the islands due to the fact they would take over night to dry and harden as the material I used was mod-rock which uses water to soften the plaster of paris and then as the water evaporates the mod-rock hardens. then I can focus on the next stages. as well as the islands day 1 was used to start modelling the houses, being as though the walls were coated in grout they also needed over night to dry.

The island process
(photos in this segment are from a different module, the set is a larger island using the same process)


A base of foam board for rigidity, then built up layers of newspaper held down with masking tape to form the islands bumps and mounds


Then a generous coating of mod-rock to form the overall mountainous aesthetic I was looking for. I also coated it in plaster of Paris mixed with water to fill in the little square holes left behind by mod-rock that hasn't blended properly. and being as though its a miniature the details need to be very precise!


Then came a concentrated sprinkling of a pebble/sand mix to represent the dirt and other natural features of an island.


then came the black undercoat, do make the painting stage easier to get more detail using a dry brush technique which I have found to look very realistic.

I dont have an image but the last stage of day 1 was to start modelling the houses and coating the walls in grout to let them dry for day 2.

day 1 went very well considering I had to produce 5 of everything. it felt like I was creating a small production line in my own room. but the reality is ... I was!!